R Markdown Syntax: Citations & Bibliography
Overview
Teaching: 20 min
Exercises: 10 minQuestions
How to include citations?
How to create a list of references?
How to apply different citation styles?
Objectives
Learn how to include citations
Create a list of references
Learn how to apply different citation styles
Getting the Bibliography
Let’s now move our attention to include citations and list out the references (bibliography) in our paper example. Before adding citations we need to list out all citable items and set a bibliography. In order to add a bibliography we will need to include a bibliography file in the YAML header. Bibliography formats should be specified in one of the formats supported by Pandoc on RStudio:
- MOD: .mods
- BibLaTeX: .bib
- BibTeX: .bibtex
- RIS: .ris
- EndNote: .enl
- EndNote XML: .xml
- ISI: .wos
- MEDLINE: .medline
- Copac: .copac
- JSON citeproc: .json
Note that bibliography formats are not the same as citation styles. These are specified by a CSL (Citation Style Language) that we will cover later on. For now, we will stick to the bibtex format supported by Google Scholar, which will be used to retrieve example references for our practice paper. If you use a reference manager such as Zotero, Endnote, Mendeley etc. to manage your library, you can also export the .bibtex file directly, with all citable items you consider to include in the paper.
A *.bibtex file consists of bibliography in plain-text format. Go to your R-markdown project folder, then paperToRmd then docs and open the bibliography.bibtex. We already have a couple of citable items listed in this file. Let’s take a closer look to understand their anatomy:
@misc{nature_nature_2018,
	type = {Repository},
	title = {Nature {Reproducibility} survey 2017},
	url = {10.6084/m9.figshare.6139937.v4},
	journal = {Figshare},
	author = {Nature},
	year = {2018},
}

@article{springer_reality_2016,
	title = {Reality check on reproducibility.},
	volume = {533},
	doi = {10.1038/533437a},
	number = {7604},
	journal = {Nature},
	author = {Springer, Nature},
	month = may,
	year = {2016},
	pages = {437},
}
Note that the first line specifies the type of citation, MISC for miscellaneous, and Article for papers, along with the main entry which will be used to link in-text citations further in the episode. The other lines include the metadata that describes different parts of the bibliography, such as the date, the author, etc.
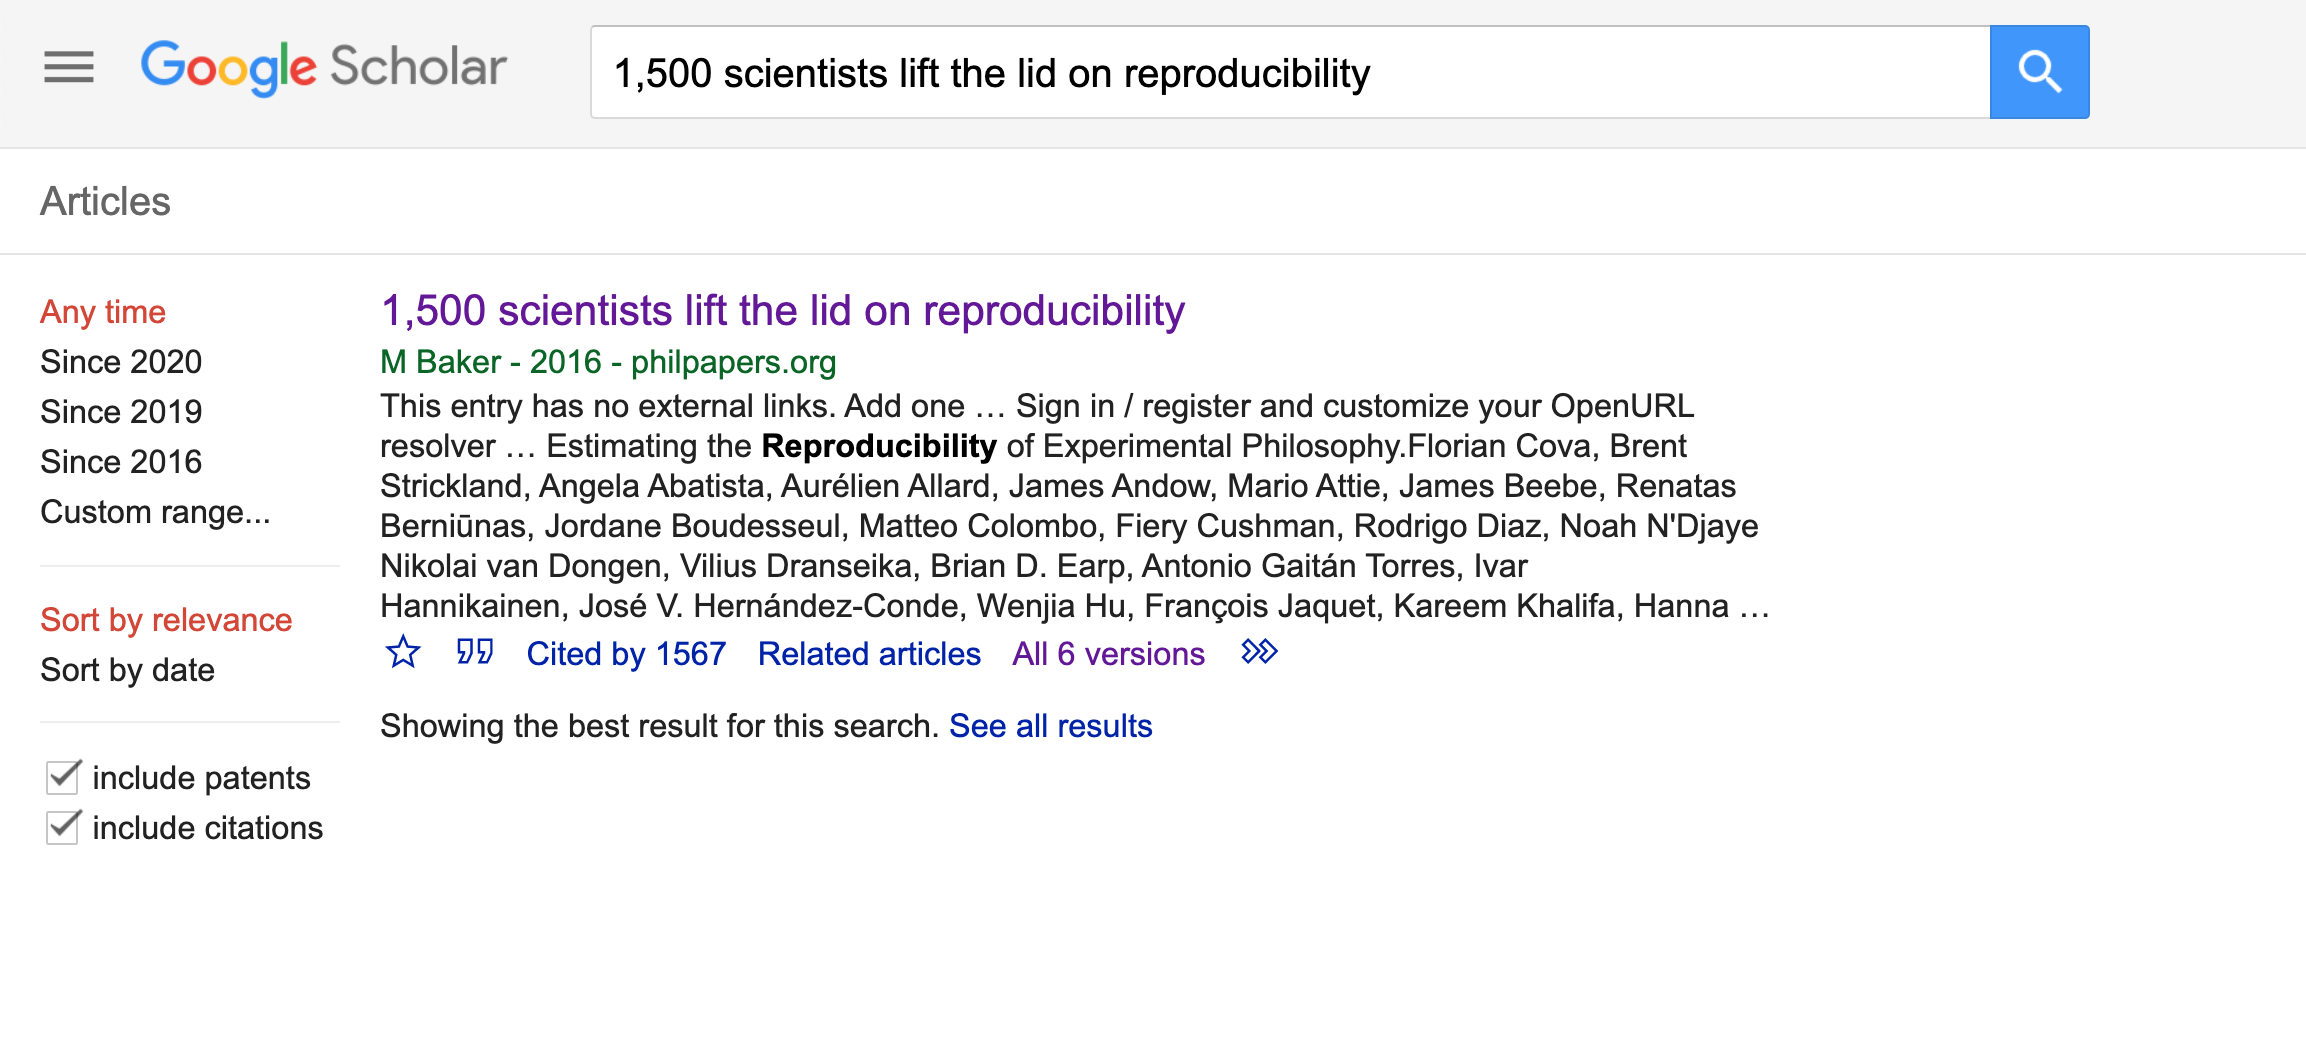
Let’s now understand the process of how to get a bibtex, using as example the item 1,500 scientists lift the lid on reproducibility authored by Baker (2016), following the steps below:
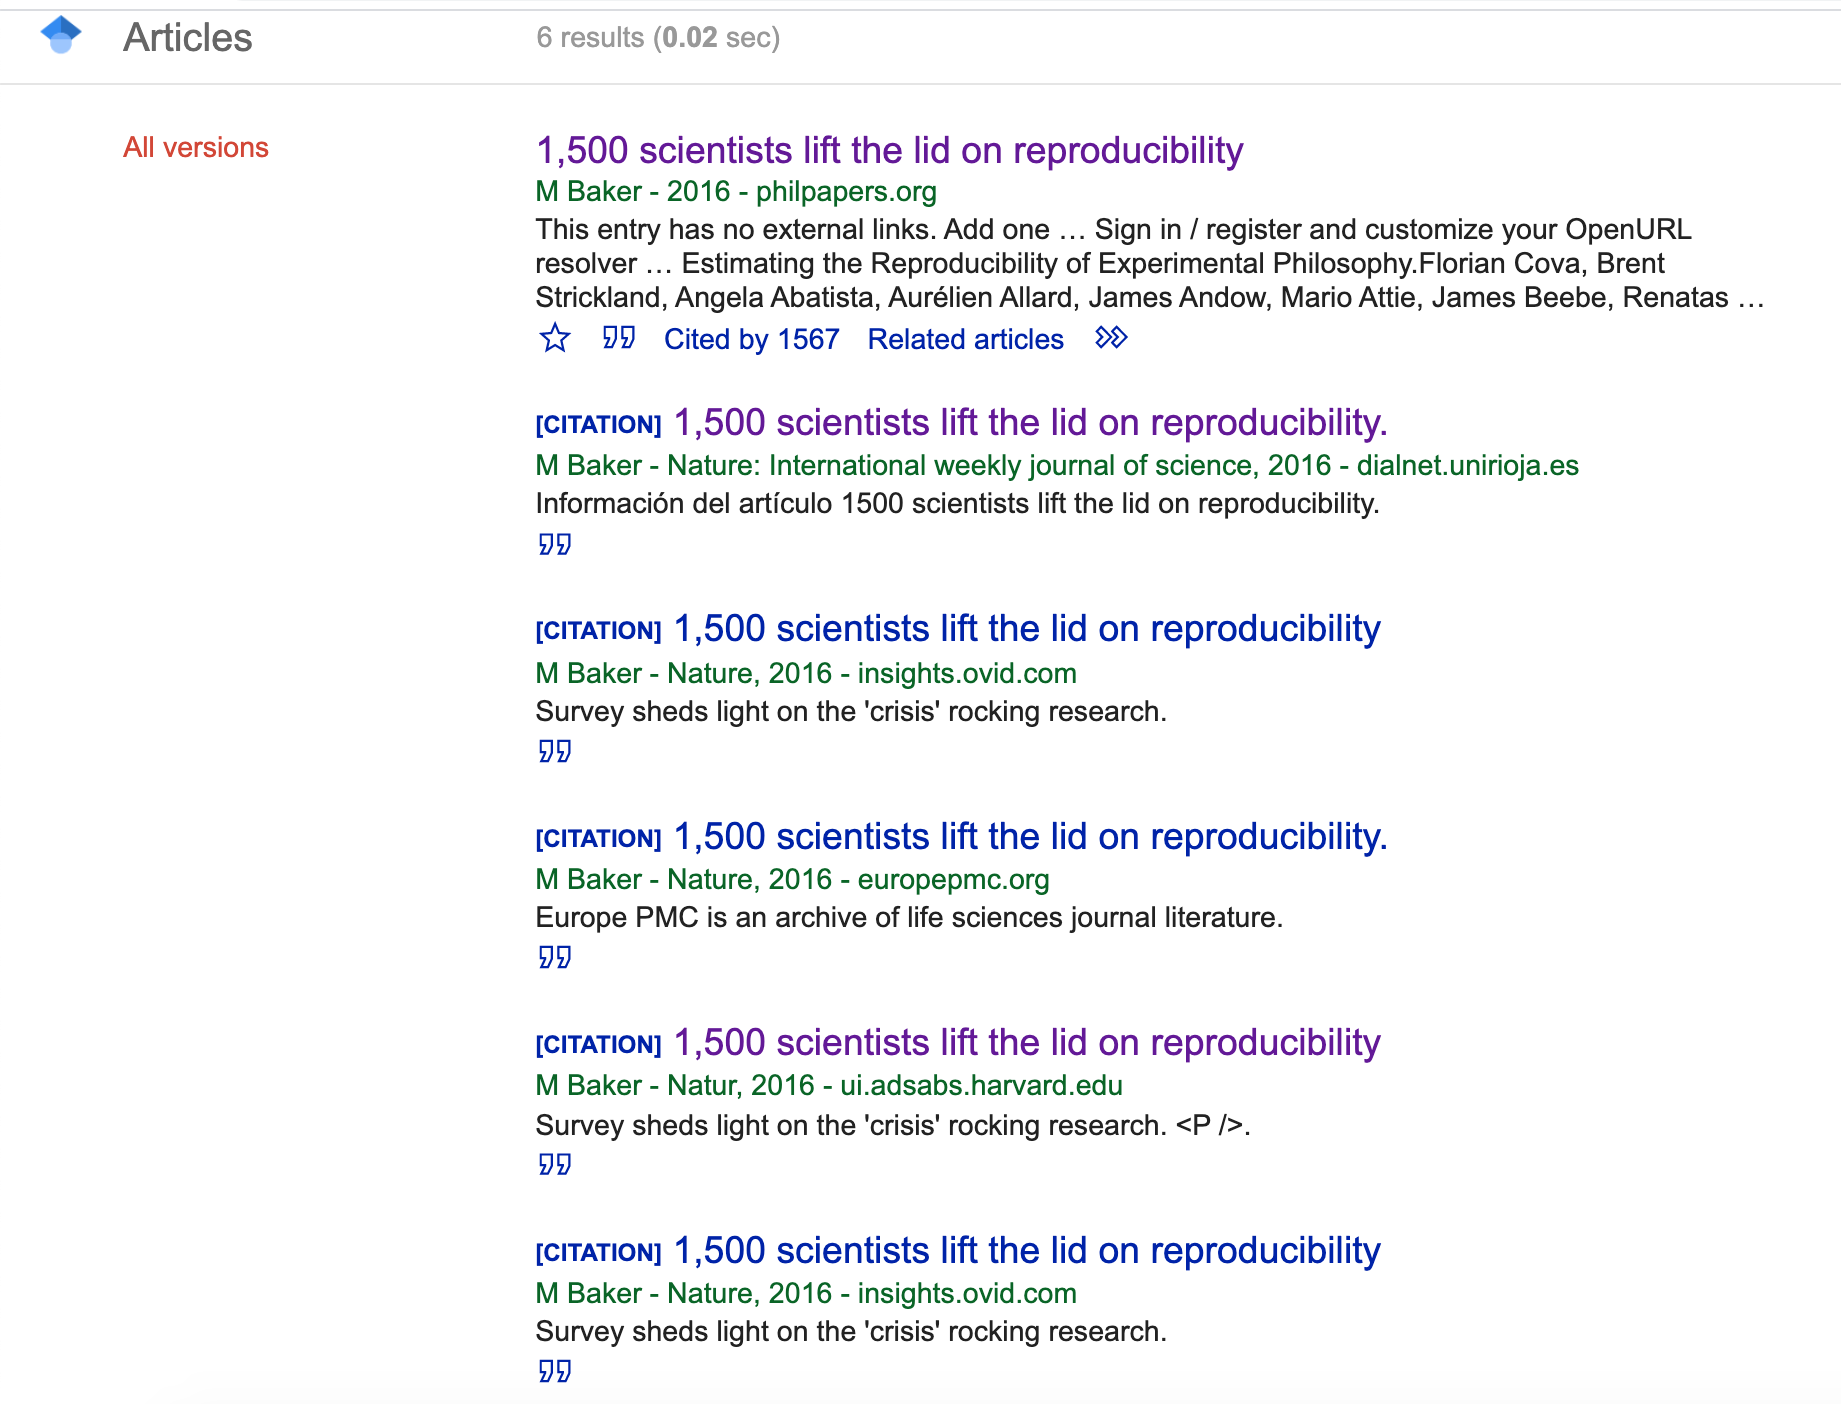
- 1) Search for the first paper listed on Google Scholar by copying and pasting the title of the paper. Make sure to use quotations to better filter results and get the right paper. A tricky part is that if you want more complete files that will render to more accurate citations you have to check for all existing versions of the same result (if any). Google Scholar amasses them altogether into one in the link “All 6 versions”, listing out different repositories and websites the paper can be found.
- 2) Click on the link to check for other existing versions. The first result does not include the journal name, so let’s choose the second one instead, which won’t require us to adjust the metadata.
- 3) When you click on the quotation icon right below the version you chose, it will prompt a window that will give you the option to choose BibTeX.
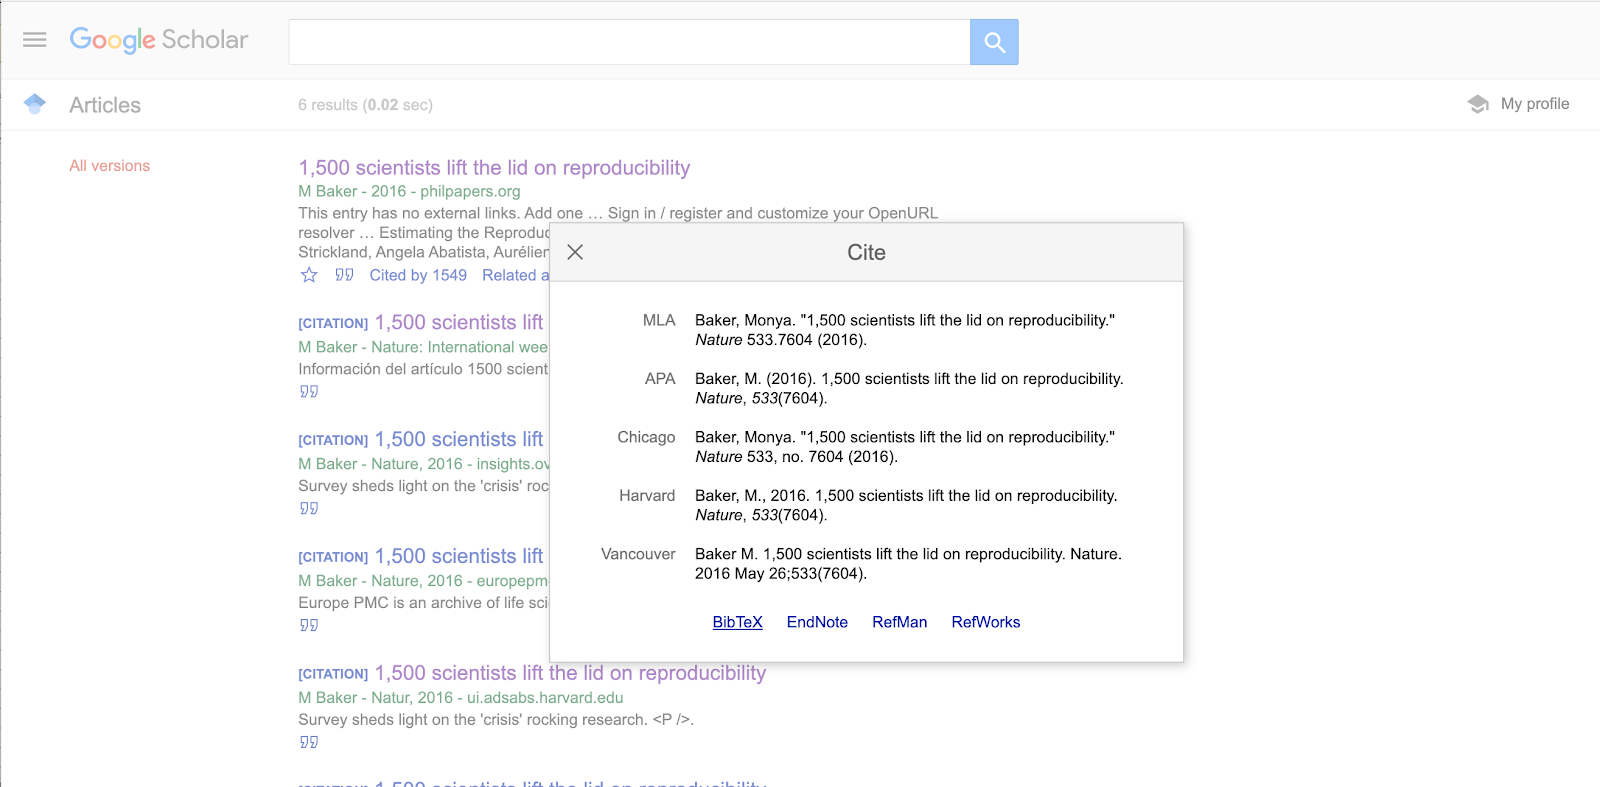
- 4) Choose the BibTeX option. It will prompt a file in your browser, like this:
@article{baker_1500_2016,
	title = {1,500 scientists lift the lid on reproducibility},
	volume = {533},
	url = {http://www.nature.com/news/1-500-scientists-lift-the-lid-on-reproducibility-1.19970},
	doi = {10.1038/533452a},
	abstract = {Survey sheds light on the ‘crisis’ rocking research.},
	language = {en},
	number = {7604},
	urldate = {2020-11-13},
	journal = {Nature News},
	author = {Baker, M.},
	month = may,
	year = {2016},
	pages = {452},
}
- 5) If you did not have that item already you would simply copy and paste this to your bibliography.bibtex file. The order would not matter, since references will be listed according to the style. It is strongly recommended to have entries separated by blank lines though. That makes them look like paragraphs, and easier to locate.
Tip: How can you get many bibtex at once?
Alternatively, you can also conduct multiple searchers and save results to your personal library on Google Scholar and export multiple items as .bibtex files in a bulk.
We already have .bibtex file with all items we need to proceed. But how will RStudio be able to link this file with the .rmd file on the other tab? Well, remember we mentioned before that we should include a bibliography file in the YAML header? In this case we will add to the existing YAML the following information:
---
bibliography: "../docs/bibliography.bibtex"
---
Note again the importance of the relative path calling the right folder. The connection between the two files is all set to get us started. For now, we won’t need to specify which format we would like to use.
By default, Pandoc will use a Chicago author-date format for citations and references and we will stick with that for now, but later we will learn how to change citation styles.
Adding Citations
Each item in the bibliography.bibtex file starts with a @ entry which specifies the type of document followed by a curly opening bracket which specifies the key that should be included to create in-text citations.
We will call a citation using the @ followed by the key. It is important to use this exact key in the .bibtex to render correct mentions in the text. Let’s see how that should be included in the R Markdown syntax for different types of citations.
Single citation
At the end of the first paragraph on the Introduction, where you find [citation example 1]. Remove this info and let’s practice adding our first citation. Let’s use the item with the key freedman_2020_2017 from the bibliography.bibtex file in the second tab. In order to cite this work you should add this key after in between brackets, as follows:
[@freedman_2020_2017]

The output you will get in Chicago style will be:

(Freedman, Venugopalan and Wisman 2017)
Challenge 7.1: Adding single citation
Locate
[citation exercise 1]in the document, and replace it by a citation to Munafo’s (2017) study.Solution
Multiple Citations
If you want to add multiple citations in a row (same parentheses) you will have to separate keys by semicolon. So let’s add Bustin (2014) and Freedman, Venugopalan and Wisman (2017) to [citation example 2]
[@bustin_reproducibility_2014; @freedman_2020_2017]
The output you will get in Chicago style will be:
(Bustin, 2014; Freedman, Venugopalan and Wisman, 2017)
Tip: You can simplify items key if you want. For instance, you can keep only the first author and year, but for the purpose of the exercises we will keep keys exactly how we got them from Google Scholar.
Challenge 7.2: Adding multiple citations
Now it is your turn! Locate in the document the note
[citation exercise 2]. Remove it and include a citation to Baker (2016) and Freedman, Venugopalan and Wisman’s (2017) studies.Solution
Keeping Authors in the narrative
There are cases authors are announced in the text, and therefore their names shouldn’t go between parentheses. Let’s say you want to add a citation to support the statement about Springer’s survey. In order to keep the institutional author out of the parentheses, we should add a hifen - before the @ followed by the citation key. Let’s add that to the [citation example 3] remark on the paper.
In that case you’ll have to first type in the last name(s) of the author(s) as only the year will be rendered. For this example the author is an organization, so let’s type Springer, then enter the key for the item, as follows:
“A recent survey conducted by Springer [-@springer_reality_2016] reported that 90%…”
The output you will get will be:
“A recent survey conducted by Springer (2016) reported that 90%…”
Challenge 7.3: Keep author(s) in the narrative
Let’s practice now how to insert citations outside the parantheses! In the same paragraph, where you find
[citation exercise 3]add a citation (year only) to your mention to Nature’s survey in order to indicate the dataset you are referring to.Solution
Time to Knit!
Check how the citations you have just created renders in your paper.
Setting the Reference List
All cited items will be listed under the section References which you created before while practicing headings and subheadings. Items will be placed automatically in alphabetical order.
Adding an item to a bibliography without citing it
By default, the bibliography will only display items that are directly referenced in the document. If you want to include items in the bibliography without actually citing them in the body text, you can define a dummy nocite metadata field in the YAML and put the citations there.
nocite: |
  @item1, @item2
To demonstrate that I will add a new bibtex from my Google Scholar Library and specify the @keyin the YAML. Note that this will force all items added in the YAML to be displayed in the bibliography.
Changing Citation Styles
There are a number of existing citation styles (CSL), but we won’t cover their differences and applications during this workshop. To use another style, we will need to specify a CSL (Citation Style Language) file in the metadata field in the YAML header.
Let’s assume that we want to use the APA 5th edition apa-5th-edition.csl instead. In order to do so, you have to make sure the CSL you want to apply is correctly named in the YAML, matching the .csl file saved in the project folder and opened in RStudio. We have done that for you. The csl for APA is saved in the bin folder, so using the relative path to the file, we will include that to the YAML:
csl: ../bin/apa-5th-edition.csl
Time to Knit!
Knit the document and note that citations and references now conform to the APA style.
Tip: Change the CSL default
You can override this default by copying a CSL style of your choice to default.csl in your user data directory.The CSL project provides further information on finding and editing styles. More information about CSL can be found here https://docs.citationstyles.org/en/1.0.1/primer.html.
Key Points
R Markdown supports different citation styles