Logging into the RStudio Jupyter Hub Instance
For this workshop, we will be using a Jupyter Hub Instance that LSIT has gracously setup for us with the software and packages preinstalled.
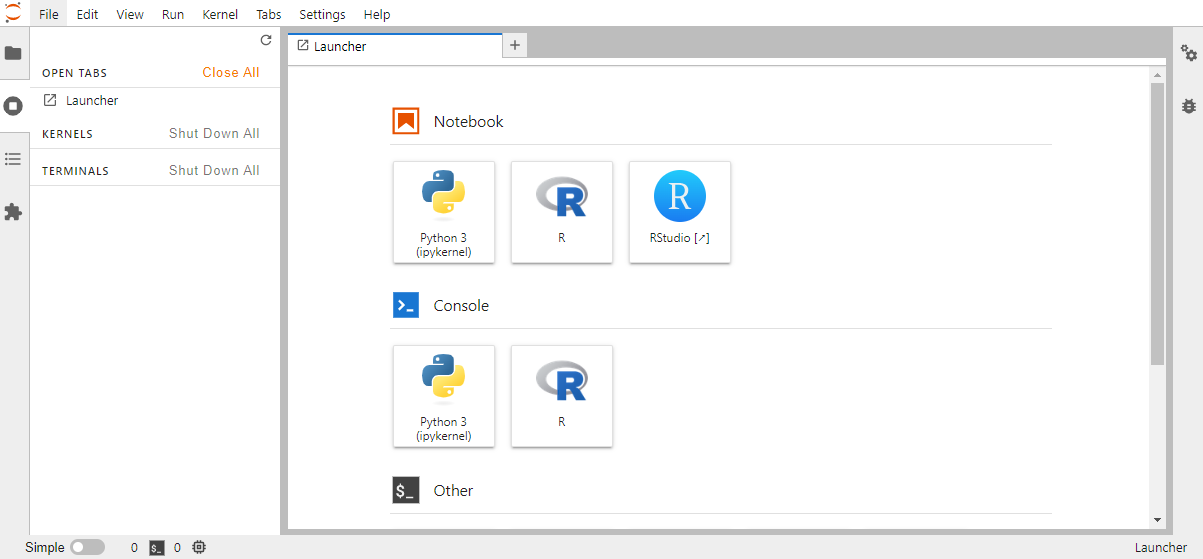
Please use your UCSB NETID to sign into the Jupyter Hub at: https://carpentryworkshop.lsit.ucsb.edu/ Once you have signed in, click the RStudio Launcher button. You do not need to follow the setup instructions below if you plan on using the Jupyter Hub Interface rather than RStudio on your own computer
Manual Install Requirements
If you are NOT using the Jupyter Hub instance, and want to use RStudio on your own computer, please follow the instructions below:
PART I: Install Software
- Github account (use existing or create new account)
- Install Git for Windows (Windows users only)
- Install R & RStudio (Two separate installations)
See instructions below for these requirements:
GitHub Account
You will need an account at GitHub.com.
You can signup for a free Github account at https://github.com/signup.
Through the Github education program,
students get additional free services beyond the basic free account.
If you are concerned about what personal information (specifically contact information) is revealed through GitHub you may review these
instructions
for keeping your email address private provided by GitHub.
Git
Git is a version control system that lets you track who made changes to what when and has options for easily updating a shared or public version of your code on github.com. You will need a supported web browser.
You will need an account at github.com for parts of the Git lesson. Basic GitHub accounts are free. We encourage you to create a GitHub account if you don't have one already. Please consider what personal information you'd like to reveal. For example, you may want to review these instructions for keeping your email address private provided at GitHub.
- Download the Git for Windows installer.
- Run the installer and follow the steps below:
- Click on "Next" four times (two times if you've previously installed Git). You don't need to change anything in the Information, location, components, and start menu screens.
-
From the dropdown menu, "Choosing the default editor used by Git", select "Use the Nano editor by default" (NOTE: you will need to scroll
up to find it) and click on "Next". - On the page that says "Adjusting the name of the initial branch in new repositories", ensure that "Let Git decide" is selected. This will ensure the highest level of compatibility for our lessons.
- Ensure that "Git from the command line and also from 3rd-party software" is selected and click on "Next". (If you don't do this Git Bash will not work properly, requiring you to remove the Git Bash installation, re-run the installer and to select the "Git from the command line and also from 3rd-party software" option.)
- Select "Use bundled OpenSSH".
- Ensure that "Use the native Windows Secure Channel Library" is selected and click on "Next".
- Ensure that "Checkout Windows-style, commit Unix-style line endings" is selected and click on "Next".
- Ensure that "Use Windows' default console window" is selected and click on "Next".
- Ensure that "Default (fast-forward or merge) is selected and click "Next"
- Ensure that "Git Credential Manager" is selected and click on "Next".
- Ensure that "Enable file system caching" is selected and click on "Next".
- Leave all options unchecked on "Configuring experimental options" and click "Next".
- Click on "Install".
- Click on "Finish" or "Next".
This will provide you with both Git and Bash in the Git Bash program.
Video Tutorial
For macOS, install Git for Mac
by downloading and running the most recent "mavericks" installer from
this list.
Because this installer is not signed by the developer, you may have to
right click (control click) on the .pkg file, click Open, and click
Open on the pop up window.
After installing Git, there will not be anything in your /Applications folder,
as Git is a command line program.
For older versions of OS X (10.5-10.8) use the
most recent available installer labelled "snow-leopard"
available here.
Video Tutorial
If Git is not already available on your machine you can try to
install it via your distro's package manager. For Debian/Ubuntu run
sudo apt-get install git and for Fedora run
sudo dnf install git.
R
R is a programming language that is especially powerful for data exploration, visualization, and statistical analysis. To interact with R, we use RStudio.
Install R by downloading and running this .exe file from CRAN. Also, please install the RStudio IDE. Note that if you have separate user and admin accounts, you should run the installers as administrator (right-click on .exe file and select "Run as administrator" instead of double-clicking). Otherwise problems may occur later, for example when installing R packages.
Video Tutorial
Install R by downloading and running this .pkg file from CRAN. Also, please install the RStudio IDE.
Video Tutorial
Instructions for R installation on various Linux platforms (debian,
fedora, redhat, and ubuntu) can be found at
<https://cran.r-project.org/bin/linux/>. These will instruct you to
use your package manager (e.g. for Fedora run
sudo dnf install R and for Debian/Ubuntu, add a ppa
repository and then run sudo apt-get install r-base).
Also, please install the
RStudio IDE.
PART II: Install Packages in Rstudio
Install the following packages in RStudio: bookdown,quarto tidyverse, rticles,BayesFactor, patchwork , rprojroot.
We will be covering the purpose of using packages and recap different ways to install and manage them in RStudio. Nonetheless, pre-installating the packages we will be using for this workshop will save us some precious time since installation time may vary among learners. Here are the steps for two possible approaches you may follow for completing this process:
Using Menus and Tabs
1) Open R studio
2) Select from the upper menu Tools > Install packages... or click on the Packages tab in the bottom-right section and then click on install. Either action will prompt a box dialog.
3) In the Install Packages dialog box, copy this command bookdown, quarto, tidyverse, rticles, BayesFactor, patchwork, here under the Packages field, make sure the option install dependencies is selected, keep other information unchanged, and then click install.
4) Don’t be alarmed by the stop sign that will blink (and do not click on it otherwise you will cancel the process) or the red text messages. Once the process completes the cursor will be preceeded by a greater-than sign >.
Entering function in the console
1) Copy and paste one of the following functions to the console and wait for the process to complete:
`install.packages("bookdown")
 install.packages("quarto")
 install.packages("tidyverse")
 install.packages("BayesFactor")
 install.packages("patchwork")
 install.packages("here")`
or
`install.packages(c("bookdown","quarto", "tidyverse", "BayesFactor", "patchwork", "here"))`
2) Don’t be alarmed by the stop sign that will blink (and do not click on it otherwise you will cancel the process) or the red text messages. Once the process completes the cursor will be preceeded by a greater-than sign >.
You may close RStudio and all packages will remain installed when you reopen it.